Search Catalog
Site Navigation:
Home
Projects &
Online Books
Reference Services
Other Services
Archives
Collections
Botanicus Digital
Library
Library Links
Staff
Research Home
Contribute to
the Ellerman
Challenge
Field Techniques Used by Missouri Botanical GardenPRESSING PLANTS Use of the End Piece of Press Order of Sheets While Pressing Numbering 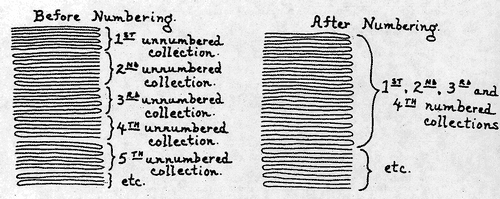 After the sheets are numbered, put all or half of the bundle with the folds in the same direction. Do not flip half of the bundle upside down to balance the packet--this just makes it more complicated to process the plants later. Complete Collections Size Constraints on Specimens Wilting Except for vines, slightly break stems and fold them into a "V" or "N" rather than curve them: 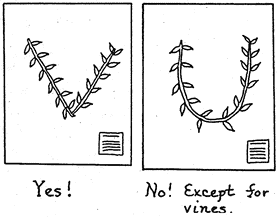 If plants are small, put several on the sheet to fill it up: 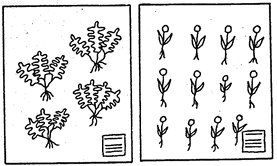 Balance the quality of individual plants on each sheet, some nice, some poor (if not all in prime shape). Otherwise you may end up with the poorest sheet for your own institution. It simplifies later processing if the collector designates the chosen home institution sheet. Grasses and other herbs should not be "top-snatched." Always collect the full specimen, roots and all; dig deep enough to find rhizomes or other underground parts if they are present. Be certain to remove the soil from the roots by shaking or washing. It is best to arrange plants for pressing with the same surface facing upwards as will be seen once the specimen is mounted. Always keep that side up during pressing, numbering, drying, and sorting. Arrange plants before drying to clearly show both surfaces of leaves and reproductive structures, paying particular attention to ferns. Press some flowers open, and some closed, and others split to show the internal structures (especially in Polemoniaceae and monocots). Phyllaries (bracts) in the capitula of Asteraceae are very important, and should be pressed so some can be clearly seen. Pubescence, stomata, and other characters are frequently more important on lower leaf surfaces than upper. If only one large leaf or fern frond sample is available, it should be folded so part of both surfaces can be seen. 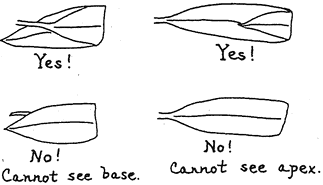 Do not cover flowers, fruits, or stems with leaves; either spread the leaves away from the other plant parts, or fold the leaf underneath them. When folding leaves, keep the larger part underneath so that you can still measure length, width, etc.: 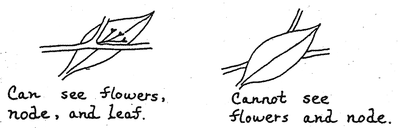 Cut or break off excess leaves, but always keep part of the petiole to show the position: 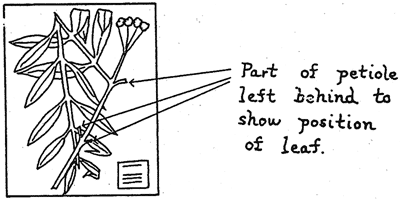 Never cut off the petiole base and the stem attachment of a compound leaf. If possible, keep some of the petiole bases of the other leaves and the apex of the stem. Do not mistake a large compound leaf for a branch with simple leaves. Do not split the twig, because the opposite or alternate arrangement of the leaf will no longer be evident. A specimen of two sheets or more may be necessary with very large leaves. HOW TO RECOGNIZE COMPOUND LEAVES VS A BRANCH WITH SIMPLE LEAVES 1. Petiolules of leaflets are usually not round in cross-section, while true petioles tend to be round.
It is usually easier to fold the stem than to try to fold all of the leaves: 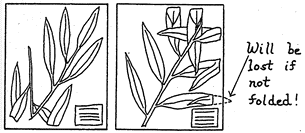 If the leaf tips stick out of the newspaper, fold them over or they will be broken off and lost. If you fold large leaves, one can sometimes put two large leaves on a sheet rather than one. Length, width, shape, upper surface, and lower surface are still observable: 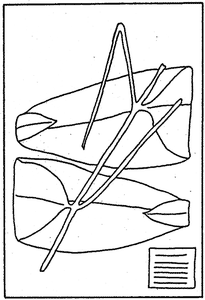 With the long leaves of palms and large ferns, take an apical section, a mid-section, and a basal portion with pinnae. State in the field notes the length of the leaf, length of the petiole, number of pinnae, and the arrangement of the pinnae (i.e., regular, staggered, or irregularly spaced) if the specimen does not show it. For palms, describe the position of the inflorscence in relation to the leaves, also whether species are solitary or colonial, and include samples of stem spines and bark. Each specimen, at aminimum, should consist of an apex, a base, a mid-section, selected parts of the inflorescence, stem, and petiole base. Photographs are very useful. 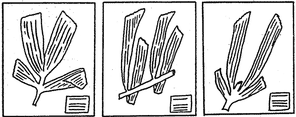 A representative specimen of large plant may require additional sheets for completeness. Even some temperate plants, such as Heracleum (Apiaceae) require several sheets for representative parts of leaves, stems, flowers and fruits. In general do not overcrowd sheets. Multiple-sheet specimens contain far more information than fewer overcrowded sheets. Large fruits should be cut into one inch thick slices, both longitudinally and transversely. It is preferable to have the fruits attached to the branches when the specimen is mounted. The one inch has been established as the maximum recommended thickness for mounted specimens at MO. It is useful to mark multiple sheets of the same specimen with the same letter. This letter is not put in the label data, rather it is used simply to facilitate reassembling the collections after they are dried. Put the letter anywhere on the sheet, but not after the number (i.e., l832A) as this designates a mixed and divided collection. 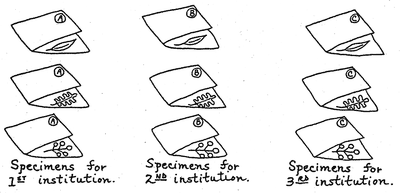 Fold large leaves so base and apex can be seen: 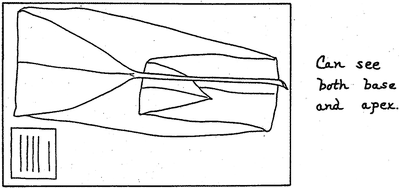 Part of the inflorescence, stem, flowers, etc., may be put on top of a leaf without losing any information as long as the shape, dimensions, and surface of the leaf can be seen. Even if parts are dried separately, they can be mounted together. 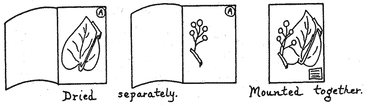 When folding large leaves, always start with the largest portion of the leaf, and then the smaller parts on top; e.g., large cordate leaf: base, fold apex, then petiole and inflorescence on top. For leaves with basal lobes, do not fold the base over, it makes it more difficult to see the shape of the leaf and to measure the lobes. Start folding large leaves with the lower surface up. The lower surface generally has more taxonomic characters than the upper. 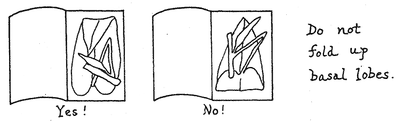 For large symetrical leaves such as Araceae, one side of the blade up to the midrib may be removed. In the field notes describe the cross section of the petiole, whether round or flattened, and whether it has ribs or sharp angles (particularly in Anthurium and Philodendron (Araceae). Sometimes it is necessary to use multiple sheets. 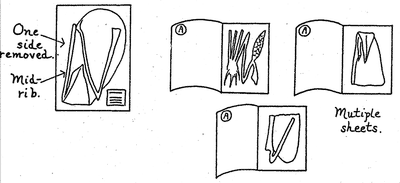 On large plants include at least part of the stem and one complete petiole. The stem can be sliced in half longitudinally to make it thinner. Roots and other thick or bulky plant parts can also be split to hasten drying. Bulbs or corms can be cut longitudinally or sliced crosswise, depending on what characters need to be shown. In Cyclanthaceae the leaf base and petiole base are very important as is the depth of the leaf division. Indicate the latter in field notes, e.g., blade divided halfway to the base, or simply cut off one side of the blade above the point of division if necessary. 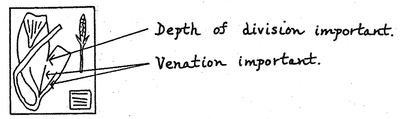 It is very useful to preserve flowers of Iridaceae, Lentibulariaceae, Burmaniaceae, Zingiberaceae, Orchidaceae, and Marantaceae in a 50% alcohol solution with a few drops of glycerine in whirlpacks or vials for later study. The glycerine prevents the material from completely drying if the fluid should be lost or evaporate. Put the collector's name and number on a piece of paper in the vials using an alcohol-proof marker, ink, or pencil. In Passifloraceae it is important to cut open at least one flower on each sheet so that the internal structure is observable. In other families with few large flowers, e.g., Cactaceae it is useful to add cut-open flowers to each specimen, whenever possible. When collecting delicate aquatics it is sometimes best to carry a flat pan, fill it with water and float the plant onto the paper. Some collectors prefer using a piece of good quality white paper which can then be glued onto the herbarium sheet and the specimen can be tacked with glue or library tape to hold it to the paper. Other collectors use regular sheets of newspaper, or plain newsprint, or wax paper when available and float the plant onto it. The specimens generally come off easily with a little scraping with a scalpel blade or knife. If there is a shortage of newspaper specimens may be combined and sorted into separate sheets later. Write "____ specimens" or "divide into ____ specimens" on the edge of the newspaper. This should only be done when absolutely necessary. Each specimen must be transferred to a separate newspaper before drying.
|

© 1995-2025 Missouri Botanical Garden, All Rights Reserved
P.O. Box 299, St. Louis, MO 63166-0299
314-577-5100
See the World!
Technical Support